Published April 26, 2017 10:35AM
Recipe: Crispy Kale Bars
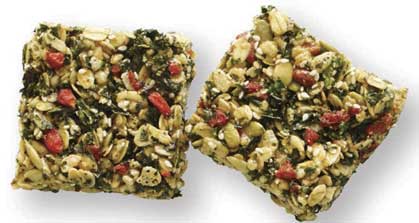
Combine kale chips and oats for a post-workout iron boost
Editor’s Note: This is Part III in an online series of recipes from Camilla Saulsbury’s Power Hungry: The Ultimate Energy Bar Cookbook.
Copious amounts of kale were sacrificed in my pursuit of a kale energy bar. On my umpteenth attempt at puréeing the leaves into gooey-green glue, inspiration struck: why not incorporate the kale in crispy kale-chip form? It only took one batch to know I had a winner. The trick to getting great bars is to make sure that the kale is super-crisp, which is a cinch so long as you dry the leaves thoroughly—I’m talking layers of clean dish towels or many turns in the salad spinner, a mere minute or two of effort, before baking. If water remains on the leaves, the kale will steam, not crisp. I don’t know about you, but the prospect of steamed kale bars doesn’t do it for me. But crispy, toasted seed-enhanced bars? Yes and yes!
MAKES 10 BARS
CRISPY KALE LEAVES
- 1 large bunch kale, tough stems and center ribs removed, torn into bite-sized pieces
- 1 tablespoon vegetable oil
BARS
- 1 cup quick-cooking rolled oats
- 1/3 cup pepitas (green pumpkin seeds) or sunflower seeds
- 3 tablespoons sesame seeds
- 1 cup unsweetened whole-grain puffed cereal (e.g., puffed wheat, quinoa, or rice)
- 1/3 cup goji berries, dried cherries, or dried cranberries, coarsely chopped
- 1/3 cup natural, unsweetened nut or seed butter (e.g., almond, cashew, or sunflower)
- 1/4 cup natural cane sugar or packed organic light brown sugar
- 1/4 cup DIY Glucose Syrup (see page 2), organic light corn syrup, or brown rice syrup
- 1/4 teaspoon fine sea salt
- 1/4 teaspoon almond extract
1. Line an 8-inch square baking pan with foil or parchment paper and spray with nonstick cooking spray.
2. Preheat oven to 350°F.
3. To prepare the kale: Thoroughly wash the kale under cold water and thenremove all of the excess moisture by blotting the leaves between several layers of paper towels or spinning multiple times in a salad spinner. Transfer the kale to a parchment-lined baking sheet. Drizzle the leaves with the oil, tossing to coat the leaves.
4. Bake the kale in the preheated oven for 12-17 minutes until the leaves appearpaper-thin and crisp, but not browned (watch closely). Using the parchment liner, transfer the kale to a rack and cool completely, about 10 minutes.
5. Meanwhile, spread the oats, pepitas, and sesame seeds on a large rimmedbaking sheet. Bake in the preheated oven for 5 to 8 minutes, shaking halfway through, until golden and fragrant. Transfer to a large bowl; stir in cereal and berries.
6. Crumble the cooled kale leaves into the bowl; gently stir to combine.
7. Combine the nut or seed butter, sugar, syrup, and salt in a small saucepan. Heat over medium-low, stirring, for 4 to 5 minutes until the sugar is dissolved and the mixture is bubbly. Remove from heat and stir in the almond extract.
8. Immediately pour the syrup mixture over the oats mixture, mixing with a spatula until coated.
9. Transfer the mixture to the prepared pan. Place a large piece of parchment paper, wax paper, or plastic wrap (coated with nonstick cooking spray) atop the bar mixture and use it to spread, flatten, and very firmly compact the mixture evenly in the pan. Refrigerate at least 1 hour until firmly set.
10. Using the liner, lift the mixture from the pan and transfer to a cutting board. Cut into 10 bars.
BAR TIPS
- For best results, do not use peanut butter; it will overwhelm the other flavors in the bars.
- The ratio of dry and liquid sweeteners here is essential for binding the bars—experiment at your own risk!
- The crispy kale leaves can be prepared up to 1 day ahead. Cool completely and store in an airtight container until ready to use.
NUTRITIONAL INFO
- Serving size: 1 bar
- Calories: 205
- Fat: 8.5 g, (Saturated 1.4 g)
- Cholesterol: 0 mg
- Sodium: 102 mg
- Carbs: 29.3 g (Fiber 2.5 g, Sugars 15.8 g)
- Protein: 5.8 g
BAR KEEPING
- Tightly wrap the bars individually in plastic wrap.
- Room temperature: 2 days
- Refrigerator: 1 week
- Freezer: 3 months in airtight container; thaw 1/2 hour
BAR VARIATIONS
Crispy Spinach and Apricot Bars: Prepare as directed, but use 6 cups of packed baby spinach leaves in place of the kale and an equal amount of chopped dried apricots in place of the dried berries. Omit the almond extract and add 1 1/2 teaspoons finely grated orange zest instead.
This recipe was excerpted from Camilla Saulsbury’s Power Hungry: The Ultimate Energy Bar Cookbook.
DIY GLUCOSE SYRUP
This multipurpose syrup can be used in place of any other syrup, but it also has the chemical structure that is needed to bind particular bars, especially those lacking other binders; honey, agave nectar, and maple syrup will not work in its place (if you have ever had a pan of homemade energy bars or granola bars result in crumbles, you know what I mean). The only (natural) alternatives are organic corn syrup and brown rice syrup. You should note that you will need to buy one piece of special equipment before you boil your first batch: a candy thermometer. Did you just start to panic? Please don’t! The candy thermometer simply clips to the pan and insures that your efforts turn out perfectly. They are inexpensive, too, and available at any kitchen supply store; I’ve even seen them at well-stocked grocery stores. After just one batch, you’ll have more than paid for the expense of the thermometer with your savings.
ADVERTISEMENT
MAKES ABOUT 2 CUPS
- 1 cup water
- 2 2/3 cups organic, granulated, light-colored natural cane sugar (evaporated cane juice)
- 1/2 teaspoon cream of tartar or fresh lemon juice
- 1/8 teaspoon fine sea salt
TOOLS
- Candy thermometer that can clip to the side of the pan
- Stainless steel or silicone spoon (do not use a wooden spoon)
- Pastry Brush
- Clean glass jars with lids (recycled jars are fine)
1. Set a small dish of water and the pastry brush directly beside the stove.
2. Combine the water, sugar, cream of tartar, and salt
in a medium, heavy-bottom saucepan and stir with the stainless steel or silicone spoon until blended. Clip the candy thermometer to the side of the pan and set the pan over high heat. Do not stir the sugar after this point.
3. As the sugar comes to a boil, dip the pastry brush in
the dish of water and brush down the sides of the pan to dissolve any sugar crystals that could cause the syrup to re- crystallize.
4. Bring the mixture to a full boil; you will no longer need to brush the sides of the pan. Continue boiling until the syrup just barely reaches a temperature of 240°F (it is preferable to be a few degrees under than a few degrees over). Immediately turn off the heat, remove the candy thermometer, and carefully move the pan to a cool spot on the stove or a cooling rack. Allow the syrup to sit undisturbed until it has cooled completely, at least an hour.
5. Carefully pour the cooled syrup into jars, seal with the lids, and store in the cupboard.
TIPS
- To make the cooled syrup easier to pour, remove the metal lid from the jar and then place in a saucepan of simmering water to warm the syrup until pourable (about 5 to 6 minutes). Alternatively, microwave the opened jar of syrup on High in 30-second intervals until pourable.
- This recipe can be doubled.
STORAGE
- This can be kept at room temperature for up to three months.